
Hello guys, how are you all hope everyone is fine in today’s article. you can see how to Create Windows 11 Boot USB drive. if you READ this article, poll once then you don’t have to see any other articles I know you may have already seen other articles created correctly Can’t do it once you delete this article full steps I show you how you can Create Windows 11 Boot USB.
Create Windows 11 Boot USB
I will be explaining how to create Windows 11 bootable USB flash drive, this drive can be used for different purposes you can install an “operating system” on any of the devices you can use it for troubleshooting like fixing many kinds of problems like resetting the password and if it can be used for the computer deployment, especially for the IIT people so whatever your purpose is the process is very simple now you will have to come to this Microsoft website to download Windows 11.
NOW I won’t recommend that you should go ahead and download Windows 11, from any other third-party website because that can be custom-created. Windows 11 and probably your privacy can be at Risk alright so it’s better to come to “Windows 11”, the official website once you come up here you need to “scroll down” and you will find download Windows 11.
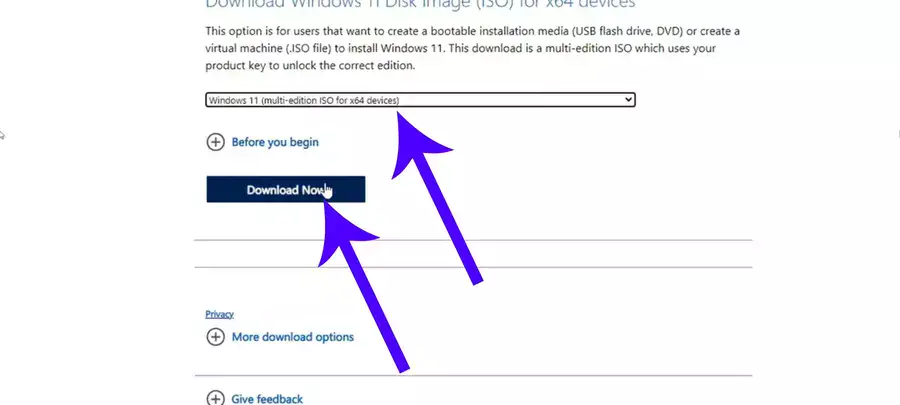
disk image ISO 4 x64 devices
now here you have to click on the drop-down choose “Windows 11 multi Edition ISO for x64” and then you have to click on “Download now” and then you have to “Choose the product language”, so go and “Choose English United States” and then click on “confirm” now after that you will be getting a “download option” download it I have arrived
downloaded it it’s around five point something gigabytes so it may take some time so kindly wait until the “ISO file” has been downloaded you can see that I have just downloaded this today and this is a Windows 11.
ISO so what next
You will have to do you will have to come to a different website to make it a bootable USB drive. and the software is called “Rufus so once” you come up here again you will be getting this link as well in the description so don’t worry about it then once you come here you have to click on the Rufus 4.1.exe click on it “close”.
The advertisement and this file will be also downloaded, all right so once you have downloaded the “ISO file” and the Rufus now, you need to make sure that you have connected. your pen drive your USB drive or the external hard drive that you want to make a Windows 11 bootable Drive.
so let me show you my drive, if I go to this PC you can see I have an “external drive”, uh just to show you it’s “around 460”. gigabyte and your drive should be at least of 8 gigabytes if you’re using any kind of a small pen drive or a USB drive.
so make sure that everything
has been deleted, and the drive is formatted. and it should contain around 8 gigabytes. of space 8 gigabytes or more, then that okay so once you have connected. your “device next” what you will have to do is come to the download page and just double click on “Rufus” to run it then click on “yes” Now it says do you want to allow a post to check the “application update” online so you have to click on no and this kind of page.
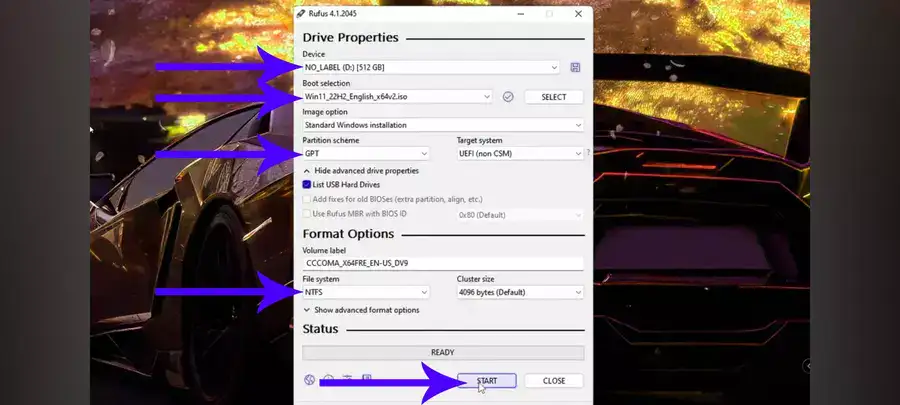
will be coming up so now, here on the top you will find the device. section and here from the drop you need to “choose the drive”. that you want to make bootable sometimes it automatically. detect it but if not then you have to click on the “drop down”, and if you don’t find anything. then you have to click on “show Advanced Drive properties”, and check this option let’s “USB hard”.
drive so probably
You’re trying to convert, any kind of hard drive or “SSD”. then you have to check this “option and this drive”, will be available now all right so select the right drive. from here and then below you’ll find the “boot selection” so click on select then choose the “Windows 11 ISO image”, then click on Open and in the partition scheme.
you have to set it to GPT, the file system will be NTFS rest you don’t have to do anything. then you have to click on “start again” Here you don’t have to do anything click on “OK” and then click on “Yes” and now the process will start. you just have to wait until it’s been 100 or fully completed.
All right so once it’s been done
the “status section” you will find a “ready option”, and it’s all been completed. so if I go and close it and again open the “file explorer”, you can see how this drives. letter has been changed, and it says CCC Oma and that indicates that this drive has now been created. as a “bootable Windows 11”, drive so now you can use it for any purpose. whichever you want to and if I open it you will see all the Windows installations.
File here and you can quickly, plug it into your device or for whatever purpose. you want to use so this is the best! and the easiest and safest way to create bootable Windows 11. drive or USB pen drive with this simple step so hopefully, guys this article will surely help you if yes do not forget to like And subscribe, and for any questions let me know in the comment section and I see you in the next article bye.